- What is a back box?
- What are metal back boxes used for?
- What are the methods of metal back boxes installation?
- What depth are metal back boxes?
- How is a back box attached?
- Do you need to earth plastic back boxes?
- What are the different types and sizes of plastic back boxes?
- What are the different methods for plastic back box installation?
- How to install a plastic back box?
What is a back box and what you need to know about back box installation?
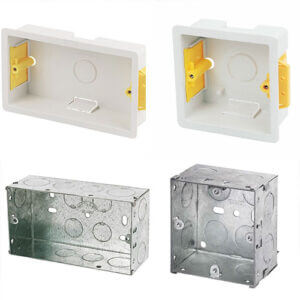
A plastic back box also named patress box is a moulded plastic box generally made of either PVC or resin. This is fixed to the surface of the wall so that is an
electrical socket, light switch, FCU etc. Plastic back boxes do the same job as a metal back box. The metal back boxes are recessed into a wall’s surface, and the plastic back boxes are generally surface mounted or fixed to the face of the wall.
What are metal back boxes used for?
The metal back boxes are generally used to repair electrical sockets onto a wall. They can be used to repair FCU’s,
cooker switches, isolation switches etc.
On what surface can metal boxes be installed?
The metal back boxes are generally used when the electrical sockets are installed into a solid wall that include bricks, stone and breeze block. This is because they allow the socket to be recessed back into the wall so that the face plate is properly fitted into the surface of the wall.The back boxes are not suitable for use if you are surface mounting the back box for example not chasing it into the wall or if you are fixing an electrical socket to a plasterboard wall. In this situation you must use a plastic back box for the surface mounting or a dry line back box for plasterboard surfaces.
What are the methods of metal back box installation?
The outline of a back box is marked on the wall’s surface. This is important as it needs to be kept straight and level but instead of drilling around the perimeter you can use an angle grinder with a diamond cutting disc. This is needed as you need to cut along each line to correct depth. Once the lines are cut properly you can then use a hammer and bolster chisel inside your cut line. In case you have an SDS drill, in most situations you will get a chisel attachment with it. Simply insert the chisel, disable drilling mode and then enable the hammer action.
What depth are metal back boxes?
There are different depths of metal back boxes and this depends on what it needs to be used for. A 16mm Deep box is great for a light switch but not useful for a 10mm shower circuit. A 47mm deep back box is more suitable for a shower circuit. This one need to be almost three times deeper than that for a light switch.
How is a back box attached?
You need to place a back box in place. Mark through two of the holes, drill them out, then insert a few wall plugs and then screw the back box in place.
Do you need to earth plastic back boxes?
There is no requirement to earth the back box considering there is one metal fixed lug on the box. You earth the accessory and then fixing screw picks up the death from the fixed lug.
What are the different types and sizes of plastic back boxes?
There are many types of plastic back boxes, the most common is the surface mount type that we have mentioned above, that is fixed to the face of a solid wall and also one other type. This type, although sometimes called a plastic back box is actually named a dry lining patress box or dry lining knockout box and is for use with dry line or plasterboard walls. Coming back to the plastic back boxes we are looking at in this project there are several different types and sizes. In terms of types, the two main types of plastic back box are single gang or 1 gang and double gang or 2 gang.
What are the different installation methods for plastic back boxes?
There are many different ways to install a back box and the most popular way is, as mentioned, surface mounting them and running cables between each point by using plastic trunking.
Holes are generally made in the bottom of the back box and the cable is run up through the trunking to connect to the socket or to the switch etc. This setup makes for a very quick and cheap installation.
Another technique would be to make holes in the sides of the back boxes and then run trunking between them to hold the cabling. This look is a little tidier than using acres of trunking but is not considered to be as effective.
One final technique example is when you already have a cable in place that has been chased into the wall.
How to install a plastic back box?
You can use the following steps for back box installation”
- Knock out Screw Fixings and the Cable Access
- Position the back box in place on the wall existing trunking and the cable holes.
- Screw Through the Fixing Holes
- Screw the back box in place.
- Run Cables
- Once the box is fully fixed in place, the only job left to do now is to run in your electrical cables and then connect up whatever fixture you are installing.
If you’re interested in other electrical services, please see our
electrical installation services page